Set up your app for Push Notifications - iOS
Setting up your Xcode workspace and adding the PushSDK
Our SDK uses CocoaPods to simplify integrating and keeping our SDK updated. If the project you're integrating with is already using CocoaPods, great, head on down to step 3. If not, let's get it ready.
Step 1 - Add a service extension
In order to do some of the more advanced functionality in our SDK, you need to add a "Notification Service Extension" to your project. Open it up and in Xcode go to File -> New -> Target and select "Notification Service Extension".
Enter a sensible product name (like MyAppNotificationServiceExtension) and then hit finish.
Xcode will ask if you want to Activate a new scheme - answer no to this, otherwise next time you try to debug your app, you'll just end up debugging the Notification Service Extension.
Step 2 - Set up the CocoaPods environment
First step is to install CocoaPods and update your project to use it. Make sure Xcode isn't running, then in a terminal on your mac, run
sudo gem install cocoapods
to install CocoaPods. If you have trouble installing, you can have a look at this guide to try and get you going.
Once installed, stay in your terminal window, but navigate to your project's folder. In that folder, you need to run:
pod init
This will create a Podfile and get ready to add our Pod.
Step 3 - Add the PushSDK pod
Open up your Podfile in your editor of choice (we like nano or VS Code and add the pod lines to the sections below:
target 'MyAppName' do
  pod 'Pushologies', '~> 1'
end

target 'MyAppNotificationServiceExtension' do
  pod 'Pushologies', '~> 1'
end
(For an explanation of what the ~> 1 does and why you might want to put something different here, have a look at the CocoaPods versioning guide)
You file should now look something like this:
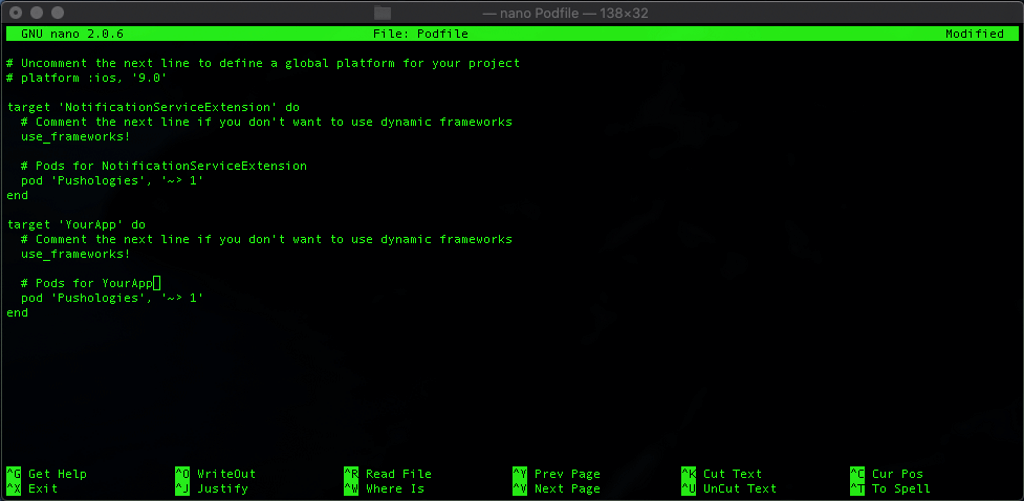
Save you file, then again from the terminal, run:
pod install
This will setup the workspace (if you don't already have one) and will pull down and install the Pushologies pod. Now, back to Xcode.
Step 4 - The Workspace
After the pod install you will now have an Xcode workspace, rather than just a project. Make sure you always, always open the workspace from now on. It's the white icon, not the blue one!

Yes
No!
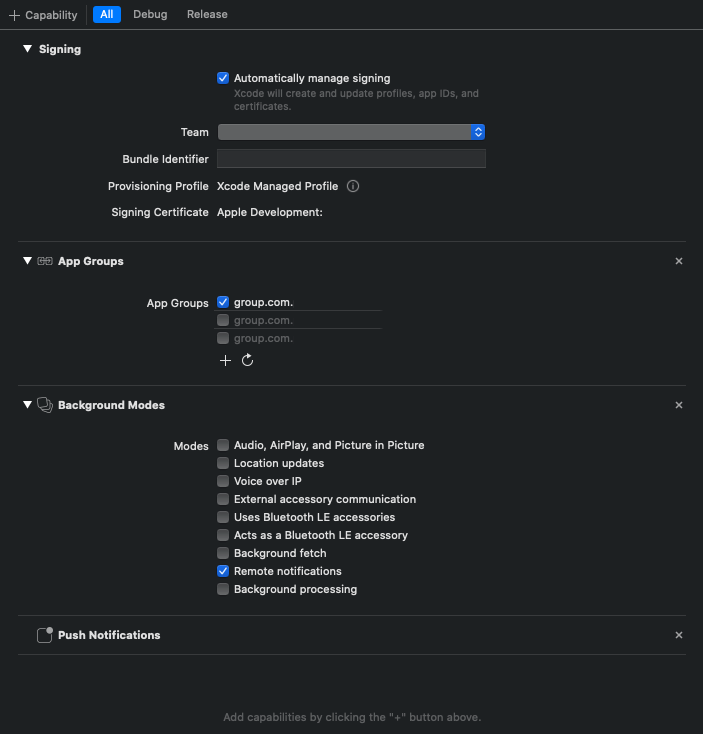
Once in, select your app and go to the "Signings & Capabilities" section. You'll need to add three to your main target, and one to the extension:
Your app target
- App Groups
- Background modes (Tick the Remote notifications box)
- Push notifications
Your Notification Service Extension
- App Groups
When setting up app groups, you need to create a new app group by clicking the small "+" under the "App Groups" section. You should choose the name carefully, but Usually the bundle identifier concatendated with the purpose of the extension (in our case, PushSDK) makes a good app group name. Have a look at the developer documentation for more details.
Once complete, you should have something that looks like this for your main app target:
Your Notification Service Extension should just have the App Groups entitlement, with the same app group ticked.
Now we're all set up, it's time to generate and upload your APNs key.
Updated over 4 years ago