SDK Integration
Find the latest npm package here
React Native SDK [v 0.2.1]
Package Installation
Install the package using Yarn or NPM
- Yarn
yarn add pushologies-notifications - NPM
npm install --save pushologies-notifications
Changes to note from v0.3.0 onwards
Personalisation has been added to the SDK which requires TenantID to be passed as a parameter while initialising the SDK. Also an option to set a delay for in-app messages has been added. Please see the SDK initialisation in Android (step7) and in iOS integration (step 6).
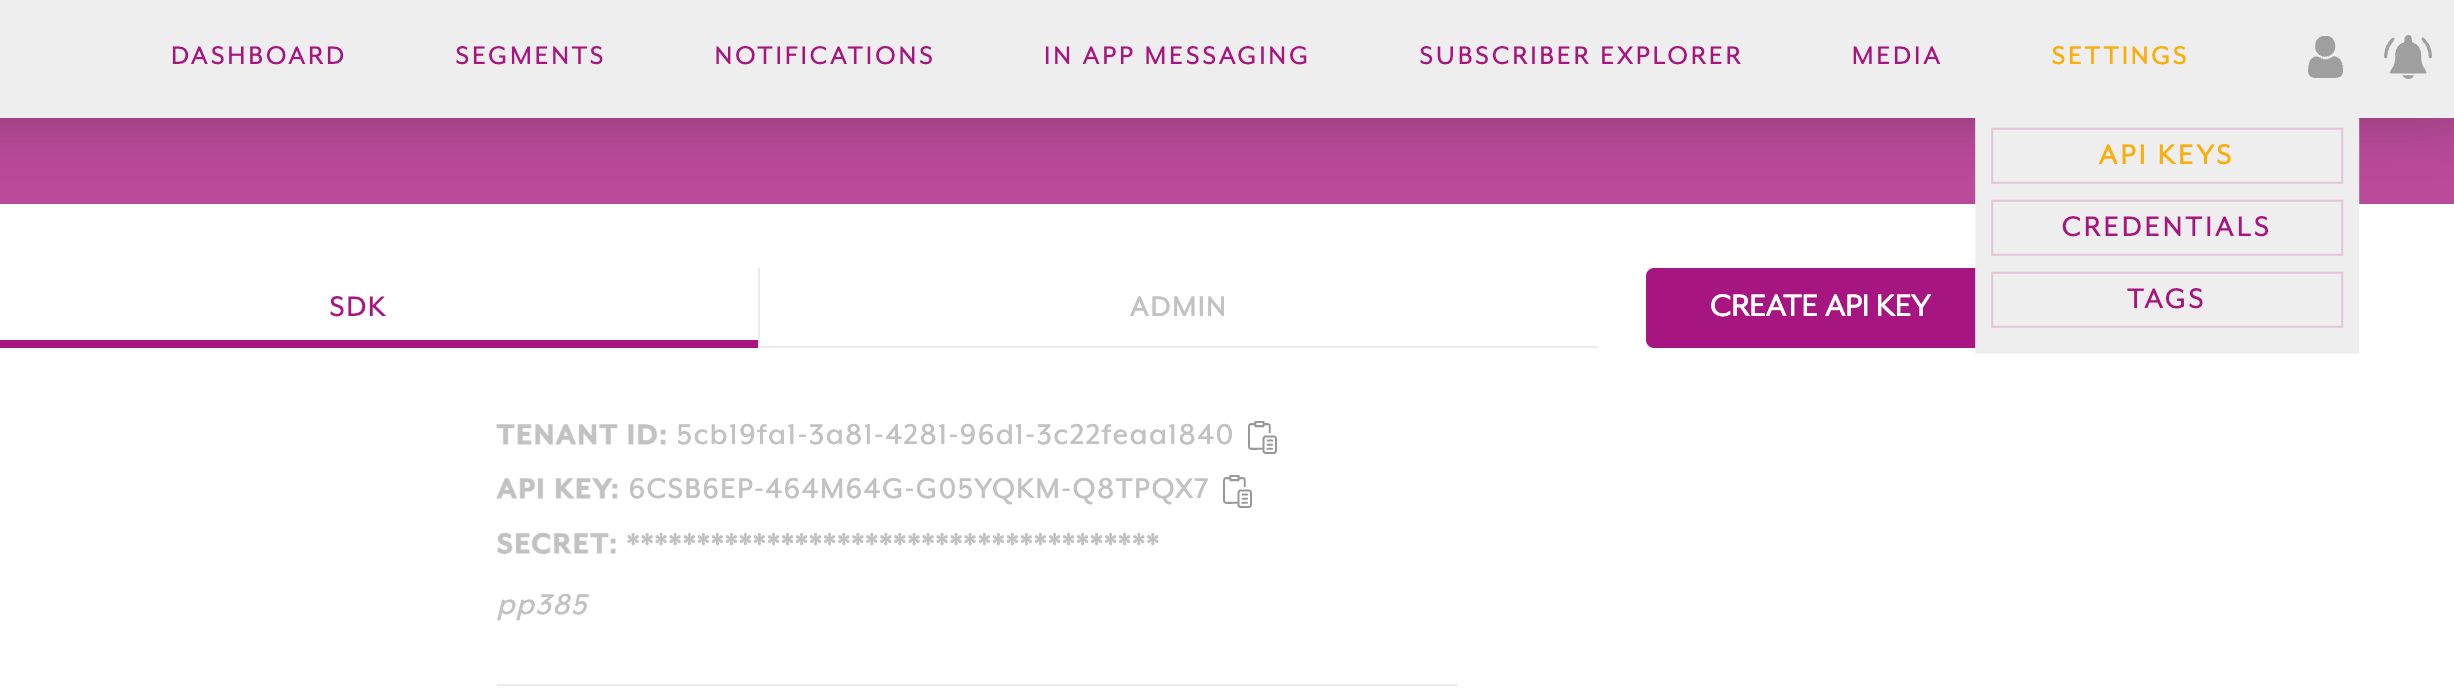
The TenantID can be copied from the Pushologies portal under the SETTINGS -> API KEYS tab. Failing to add this parameter would mean that the Personalisation values cannot be set and processed by the SDK.
Android Integration
-
Add the following to your root level
build.gradlefiledependencies { ... classpath 'com.google.gms:google-services:4.3.15' } -
Add the following to your app level
build.gradlefileapply plugin: 'com.google.gms.google-services' -
Place the
google-services.jsongot from Step 1 in the Android app folder ex: project-dir/android/app -
You have to integrate Firebase Service as explained here
-
You must request the Notifications, Locations permissions for user to get the notifications and geofence notifications to come through. You can refer example code NOTE: You may have to delay the permission requests if you are using
useEffecton Android 13 as one of the permission may not be shown if you do it immediately. You can use third party functions like useFocusEffect to achieve this.const requestNotificationPermission = async () => { const notificationPerm = PermissionsAndroid.PERMISSIONS.POST_NOTIFICATIONS; const granted = PermissionsAndroid.RESULTS.GRANTED; try { const grantedPerm = (await PermissionsAndroid.requestMultiple([notificationPerm]))[ notificationPerm ] === granted; console.log(`Notification Permisson: ${grantedPerm}\n`); return grantedPerm; } catch (err) { console.warn(err); } return false; }; const requestLocationPermissionAndroid = async () => { const finePerm = PermissionsAndroid.PERMISSIONS.ACCESS_FINE_LOCATION; const bckgPerm = PermissionsAndroid.PERMISSIONS.ACCESS_BACKGROUND_LOCATION; const granted = PermissionsAndroid.RESULTS.GRANTED; try { const grantedFine = (await PermissionsAndroid.requestMultiple([finePerm]))[finePerm] === granted; const grantedBckg = (await PermissionsAndroid.requestMultiple([bckgPerm]))[bckgPerm] === granted; console.log( `Fine Location: ${grantedFine}\nBackground Location: ${grantedBckg}\n`, ); return grantedFine && grantedBckg; } catch (err) { console.warn(err); } return false; }; -
There is no way you can initialise the SDK from the React native layer yet. So you need to initialise it in native side. You can get the API key and secret from the Pushologies portal. Initialise your SDK as follows in the Application class. Application class is usually found in this path: /android/app/src/main/java/com/project_name/MainApplication.java
Please include your own notification icon files in the drawable folder of the Android project
@Override
public void onCreate() {
   super.onCreate();
   Log.i("PushSDKModule", "onCreate");
   PushSDKModule.initSDKWithPushSDKConfig(this,
     new PushSDKConfig(
         "XXXX-XXXXX-XXXX-XXXX", //api key
         "XXXX+XXXXX+XXXXXXXXX", //api secret
         "0.0.1", // your app version
         null, // set your customer id here or enter null
         PushSDKConnectionType.ALL, // content download connection type
         true, // enable location data
         true, // enable debug logs
         true, // enable geofence based notifications
         20, // max geofence limit,
         "XXXXXXXX-XXXX-XXXX-XXXX-XXXXXXXXXXXX", // tenant id
         10000L, //inAppOpenDelay
         R.drawable.your_large_icon, // large icon which appears on the right side of the notification
         R.drawable.your_small_icon, // small icon which appears on the left
         R.drawable.your_icon_background_colour, // background colour for the small icon
   		)
   );
 ...
}
- You should start receiving the Pushologies notifications, Refer here for additional APIs
Broadly there are two ways you can handle Firebase notifications, One from the react native if you are using some react Native Firebase library, and another is to handle it in the native modules, Please do the following based on your needs.
Using Firebase in Native Module
-
If you don't have your own FirebaseMessagingService implemented in the native Android module, you just have add the following to your AndroidManifest.xml
<application> <service android:name="com.pushologies.pushologiesnotifications.PushSDKFirebaseService" android:exported="false"> <intent-filter> <action android:name="com.google.firebase.MESSAGING_EVENT" /> </intent-filter> </service> </application> -
Or, If you have your FirebaseMessagingService implemented and you're okay to inherit PushSDKFirebaseService, then implement
class MyFirebaseService: PushSDKFirebaseService() {
    override fun onMessageReceived(remoteMessage: RemoteMessage) {
        super.onMessageReceived(remoteMessage)
    }

    override fun onNewToken(token: String) {
        super.onNewToken(token)
    }
}
and add this to your AndroidManifest.xml as follows
<application> <service android:name=".MyFirebaseService" android:exported="false"> <intent-filter> <action android:name="com.google.firebase.MESSAGING_EVENT" /> </intent-filter> </service> </application> -
Alternatively, If you have your own FirebaseMessagingService implemented butNOT okay to inherit PushSDKFirebaseService then you can do following in your service and register the service in Manifest as shown in previous step.
class MyFirebaseService: FirebaseMessagingService() {
    override fun onMessageReceived(remoteMessage: RemoteMessage) {
        super.onMessageReceived(remoteMessage)
        PushSDKModule.onFirebaseMessageReceived(remoteMessage)
    }
}
Using Firebase from React Native node package
-
If you have your React native Firebase implementation then you can pass the message down to PushSDKModule as follows.
function configureFirebase() {
    messaging().setBackgroundMessageHandler(async remoteMessage => {
        var data = JSON.stringify(remoteMessage.data)
        PushSDKModule.onFirebaseMessageReceived(data);
    });

    messaging().onMessage(async remoteMessage => {
        var data = JSON.stringify(remoteMessage.data);
        console.log(`Push Message: ${data}`);
        PushSDKModule.onFirebaseMessageReceived(data);
    });
}
iOS Integration
-
Xcode Project Configuration
- Follow the Steps mentioned in this guide
- Make sure to apply those configurations to
project-dir/ios/ - Pod for the app target in the Podfile is not necessary. However you need to add it to your extensions
- Make sure you correctly setup the
NotificationServiceExtensionandNotificationContentExtensionas mentioned in the guide linked to the step
-
You may have to rename your
AppDelegate.mmtoAppDelegate.mso that you don't get the compilation errors importing the@import pushologies_notifications -
Add following Push notifications delegates to your
AppDelegate@import pushologies_notifications; ... - (void)application:(UIApplication *)application didRegisterForRemoteNotificationsWithDeviceToken:(NSData *)deviceToken { [PushSDKModule application:application didRegisterForRemoteNotificationsWithDeviceToken:deviceToken]; } - (void)application:(UIApplication *)application didReceiveRemoteNotification:(NSDictionary * userInfo fetchCompletionHandler:(void (^)(UIBackgroundFetchResult))completionHandler { [PushSDKModule application:application didReceiveRemoteNotification:userInfo fetchCompletionHandler:completionHandler]; } - (void)application:(UIApplication *)application didFailToRegisterForRemoteNotificationsWithError:(NSError *)error { [PushSDKModule application:application didFailToRegisterForRemoteNotificationsWithError:error]; } - (void)application:(UIApplication *)application handleEventsForBackgroundURLSession:(NSString*)identifier completionHandler:(void (^)(void))completionHandler { [PushSDKModule application:application handleEventsForBackgroundURLSession:identifier completionHandler:completionHandler]; } -
Initialise your SDK as follows in the AppDelegate class. AppDelegate is usually found in
ios/project_name/AppDelegate.m
Also note that you must rename your AppDelegate.mm to AppDelegate.m for you to use@import pushologies_notifications;without any compilation errors- (BOOL)application:(UIApplication *)application didFinishLaunchingWithOptions:(NSDictionary *)launchOptions { self.moduleName = @"TestProject"; // You can add your custom initial props in the dictionary below. // They will be passed down to the ViewController used by React Native. self.initialProps = @{}; //Initialise the PushSDK here [PushSDKModule initPushSDK:<API KEY> secret:<API KEY> inAppOpenDelay:<IN APP OPEN DELAY> tenantId:<TENANT ID>]; return [super application:application didFinishLaunchingWithOptions:launchOptions]; } -
You should start receiving the Pushologies notifications, Refer here for additional APIs
-
To subscribe and unsubscribe tags
const subscribeTag = async () => { try { await PushSDKModule.subscribeTag(TAG); } catch {} }; const unsubscribeTag = async () => { try { await PushSDKModule.unsubscribeTag(TAG); } catch {} }; -
To set and get customer id
const setCustomerId = async () => { try { await PushSDKModule.setCustomerId(TAG); } catch { console.log('Error Setting the customer Id'); } }; const getCustomerId = async () => { try { const customerId = await PushSDKModule.getCustomerId(); console.log(`Customer Id: ${customerId}`); } catch { console.log('Error fetching the customer Id'); } }; -
To get the device id
const getDeviceId = async () => { console.log('Get device Id'); try { const deviceId = await PushSDKModule.getDeviceId(); console.log(`Device Id: ${deviceId}`); } catch { console.log('Error fetching the device Id'); } }; -
To get all the personalisation in the form key & value pairs
const getAllPersonalisation = async () => { console.log('Get All Personalisation'); try { const personalisation = await PushSDKModule.getAllPersonalisation(); console.log(`Personalisation: ${JSON.stringify(personalisation)}`); } catch { console.log('Error fetching the Personalisation'); } }; -
To update the existing personalisation variable.
const updatePersonalisationVariable = async () => { console.log('Update Personalisation'); var key = 'key1'; var value = 'value1'; try { const success = await PushSDKModule.updatePersonalisationVariable( key, value, ); console.log(`Update Personalisation Success: ${success}`); } catch { console.log('Error Updating Personalisation'); } }; -
To show custom in-app message.
-
 const showInAppNotification = async () => {
    if (inputText == null || inputText.length === 0) {
      console.log('Identifier cannot be empty');
      return;
    }

    try {
      const success = await PushSDKModule.showInAppNotification(inputText);
      console.log(`Show In App Notification: ${success}`);
    } catch {
      console.log('Error Showing In App Notification');
    }
  };