Pushologies Android SDK Integration

This guide will walk you through getting our SDK integrated with your app. Please make sure you've already generated your Firebase credentials and have checked the prerequisites.
Changes to note from 4.4.0 onwards
Personalisation improvements made to the SDK requires TenantID to be passed as a parameter while initialising the SDK.
Prerequisites
-Minimum gradle version 7.4
-Target SDK level is 33
-Compile SDK version is 33
-Minimum SDK level is 21
Integration
- Add Pushologies sdk to your project. Add the Jitpack publishing url to the repositories block of your gradle file depending upon your needs,
- In
settings.gradle
- In
dependencyResolutionManagement {
    repositoriesMode.set(RepositoriesMode.FAIL_ON_PROJECT_REPOS)
        repositories {
            ...
            maven { url "https://jitpack.io" }
        }
}
- In project level
build.gradle
plugins {
    id 'com.google.gms.google-services'version 'version number' apply false
}
- In app level
build.gradle
 plugins {
    id 'com.google.gms.google-services'
}
- Add PushSDK dependency in your app level
build.gradleby choosing the latest version from jitpack
dependencies {
    implementation 'com.pushologies:pushsdk-android:4.8.10'
}
Note: You need to add -keep class com.pushologies.** { *; } to your ProGuard rules file in case you are using it.
-
Since this SDK uses Firebase Cloud Messaging (FCM) for push notifications, initialise the Firebase SDK if you have not already initialised. See Setup FCM Client Android App
-
Initialise the PushSDK inside the Application class.
class MyApplication: Application() {

  override fun onCreate() {
        super.onCreate()
        initPushSDK()
  }

  private fun initPushSDK() {
        FirebaseApp.initializeApp(this)
        PushSDK.init(
            application = this,
            PushConfig(
                apiKey = <API KEY>,
                apiSecret = <API SECRET>,
                tenantID = <YOUR TENANT ID>, (Optional field)
                enableDebug = true,
                appVersion = <APP VERSION>,(Optional field)
                enableGeofence = true,
                customerId = <YOUR CUSTOMER ID>,(Optional field)
                trackLocation = true,
                inAppOpenDelay = <DELAY IN MILLISECONDS>, (Optional field)
                downloadConnectionType = ConnectionType.WIFI,
                activeGeofenceLimit = 20 (Optional field)
            ),
           //Optional
            PushTheme(
                largeIconRes = <LARGE NOTIFICATION ICON>,
                smallIconRes = <SMALL NOTIFICATION ICON>,
                color = R.color.black
            )
        )
  }
}
appVersion(appVersion : String)to set the current version of your app. This will be displayed in the dashboard for analytics.enableDebug(enable:Boolean)to enable debug mode. This provides more logs on the console, disable this on production buildscolor(color: Int)to customize the notification banner title text color based on your brandsmallIconRes(iconId: Int)&largeIconRes(icon: Int)can be used to configure small and large icon of notification bannerdownloadConnectionType(connectivityMode: ConnectivityMode)is used to configure the SDK to use the connectivity type specified to download the content, if that connection is not available content will not be downloaded. You can use following enum valuescustomerId(customerId: String)is to set the customer Id to know which client is using the apptrackLocation(enable:Boolean)is to set to true if the user's location should be sent as part of metadata. Please make sure to request appropriate run time permissions to achieve this.
Use the below ENUMS to set the connection type while initialising the push SDK
enum class ConnectionType {
    ALL,
    WIFI,
    MOBILE,
    MOBILE_ROAMING,
    MOBILE_NO_ROAMING
}
- Request geofence related location permissions if required
PushSDK.requestGeofencePermission(this)
- Set Firebase token in PushSDK
FirebaseMessaging.getInstance().token.addOnCompleteListener { task ->
    if (!task.isSuccessful) {
        return@addOnCompleteListener
      }

    task.result?.let { token ->
       PushSDK.setFCMToken(token)
     }
 }
- Add the service that extends
FirebaseMessagingServiceas per Step 3 to your app. Add the following code to that service and declare it in the app's manifest.
class DemoFirebaseMessagingService : FirebaseMessagingService() {

    override fun onMessageReceived(remoteMessage: RemoteMessage) {
        if (PushSDK.isPushologiesMessage(remoteMessage.data)) {
            PushSDK.handlePushMessage(remoteMessage.data)
        }
    }

    override fun onNewToken(token: String) {
        super.onNewToken(token)
        PushSDK.setFCMToken(token)
    }
}
Now you are all set to receive the Pushologies notifications
Additional APIs
- To work with tags, you need to use following APIs
- To create a tag use the API below, Note that a tag is created only if it doesn't exist on the portal already, if it exists it just subscribes your device to that tag. You can use tags to create segments, and target your devices subscribed to those tags. Note that currently we only support creating of one tag at time, so if you want to create multiple tags you will need to call this API multiple times
fun subscribeTag(tag: String, apiCompletionHandler: APICompletionHandler = { _: String? -> }) - To delete the tag use the API below. Please note that it doesn't delete the tag on the portal, it just unsubscribes your device from that tag.
fun unsubscribeTag(tag: String, apiCompletionHandler: APICompletionHandler = { _: String? -> }) - Example code
- To create a tag use the API below, Note that a tag is created only if it doesn't exist on the portal already, if it exists it just subscribes your device to that tag. You can use tags to create segments, and target your devices subscribed to those tags. Note that currently we only support creating of one tag at time, so if you want to create multiple tags you will need to call this API multiple times
PushSDK.subscribeTag(tag) { error ->
    showCreateTagResult(error)
}

 PushSDK.unsubscribeTag(tag) { error ->
    showDeleteTagResult(error)
}
PushSDK.subscribeTag("tag", error -> {
    showCreateTagResult(error);
    return;
});

PushSDK.unsubscribeTag("tag", error -> {
    showDeleteTagResult(error);
    return;
});
Show In-App Notifications (custom triggered)
By calling this method and passing the custom event identifier string as parameter, the app will show any active in-app notification already received and stored in the app.
PushSDK.showInAppNotification("YourIdentifierHere", object : PushSDKResponse<String> {
            override fun onSuccess(result: String) {
                TODO("Not yet implemented")
            }

            override fun onError(throwable: Throwable) {
                TODO("Not yet implemented")
            }

        })
PushSDK.INSTANCE.showInAppNotification("<CustomIdentifier>", new PushSDKResponse<String>() {
    @Override
    public void onSuccess(String result) {
       ...
    }

    @Override
    public void onError(@NonNull Throwable throwable) {
       ...
    }
});
Personalisation
Please note that a new optional parameter TENANT_ID has been introduced from v4.4.0 onwards to incorporate Personalisation into the SDK. This parameter will be passed in when the SDK is initialised. Failing to add this parameter would mean that the Personalisation values cannot be set and processed by the SDK.
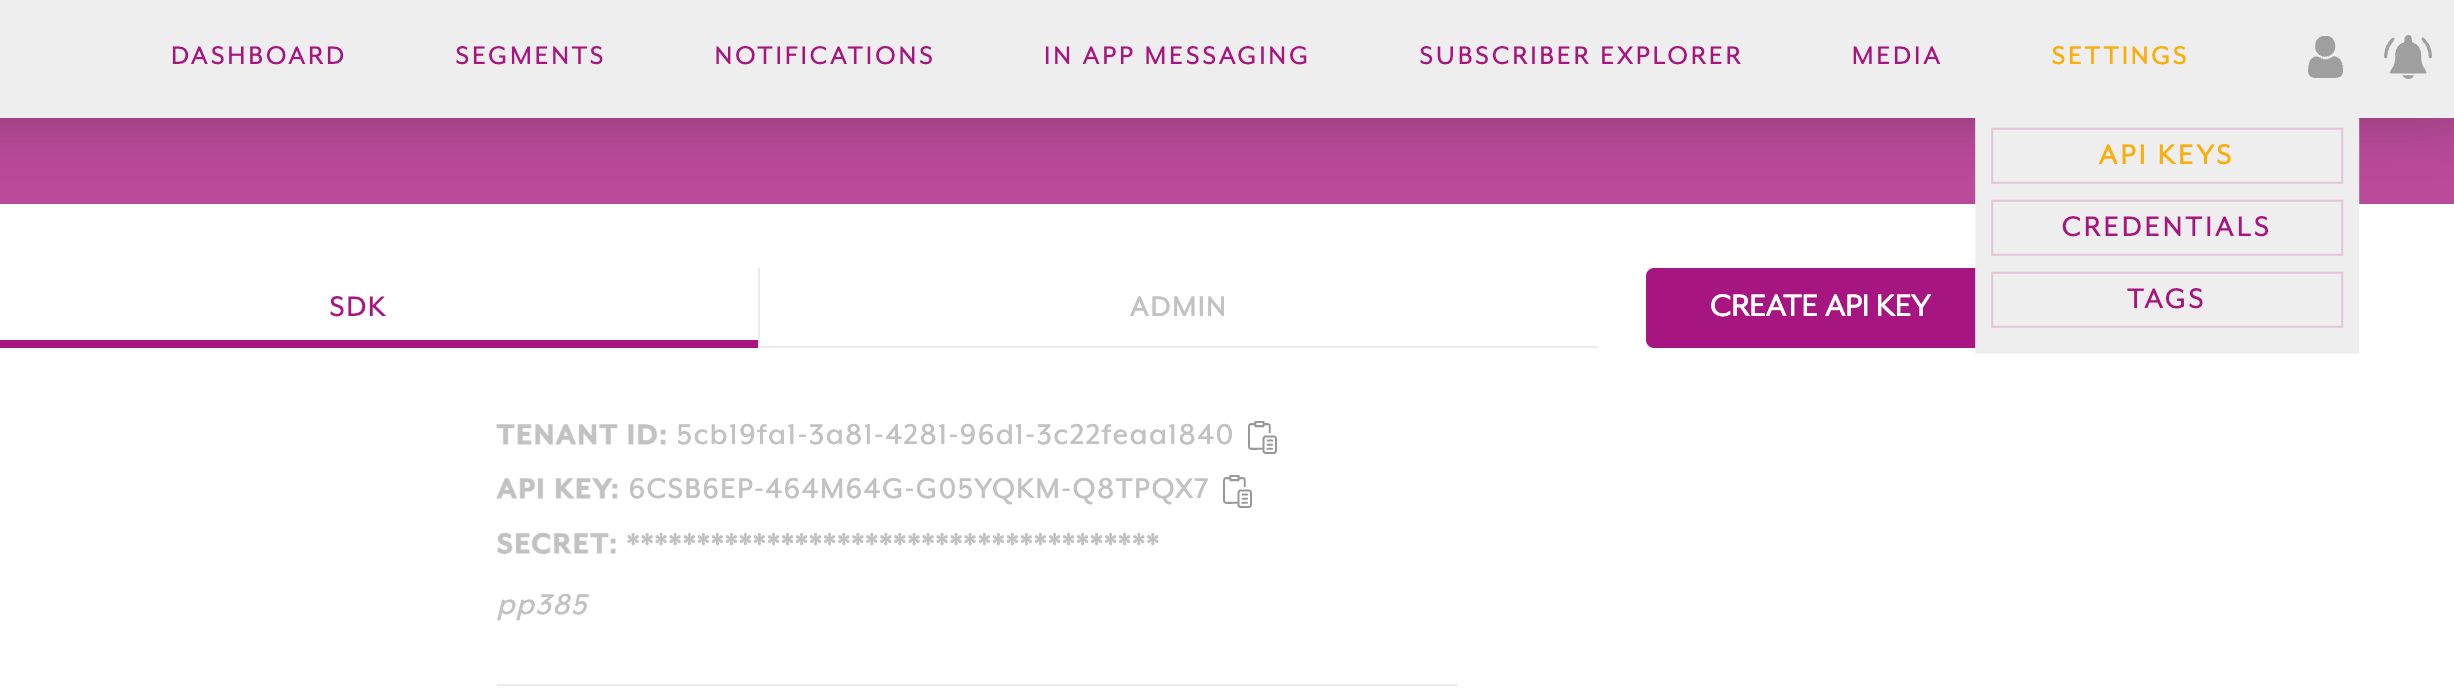
Where to find the TENANT_ID?
It can be copied from the Pushologies portal under the SETTINGS -> API KEYS tab
Methods to set and get the personalisation values.
- The below methods are used to set values to existing variables in the local personalisation schema. The local schema will be updated periodically and kept in sync with any variable changes in the Pushologies portal. Please note that if the value that you are trying to set is not part of the local schema then this value will be rejected
To set multiple values
val schema = hashMapOf<String, String?>()
schema["FirstName"] = "Mark"
schema["Key2"] = "Value2"
PushSDK.updatePersonalisationVariables(schema,
object : PushSDKResponse<String>{
      override fun onSuccess(result: String) {
        TODO("Not yet implemented")
      }
    override fun onError(throwable: Throwable) {
        TODO("Not yet implemented")     }
      }
)
HashMap<String, String> schema = new HashMap<>();
schema.put("Key", "Value");
schema.put("Key", "Value");
PushSDK.INSTANCE.updatePersonalisationVariables(schema, new PushSDKResponse<String>() {
  @Override
  public void onSuccess(String result) {
    // Handle success here
  }
  @Override
  public void onError(Throwable throwable) {
    // Handle error here
  }
});
To set a single value
PushSDK.updatePersonalisationVariable(key = "firstName", value = "Mark",
object : PushSDKResponse<String>{
            override fun onSuccess(result: String) {
                TODO("Not yet implemented")
            }

        override fun onError(throwable: Throwable) {

               TODO("Not yet implemented")         }

           }
)
PushSDK.INSTANCE.updatePersonalisationVariable("Key", "Value", new PushSDKResponse<String>() {
    @Override
    public void onSuccess(String result) {

    }

    @Override
    public void onError(Throwable throwable) {

    }
});
- This method PushSDK.getAllPersonalisations() returns a Map<Key, Value> of all personalisation keys and values stored locally. This will return an empty Map if there is no schema available or the tenantID is not set while the SDK is initialised.
val data = PushSDK.getAllPersonalisations()
SDK Event listener.
Supported Events
- NOTIFICATION_TAPPED
- VIDEO_CLOSED
The events should be observed inside the Application class as it requires a lifecycle component for the observer to stay alive. Even though it can be observed from an Activity, ViewModel or a Service, this wont be recommended as it is short-lived and events could be missed! Hence it is required to be used inside the Application class.
This is the LiveData from the SDK, on which the events will be observed
val pushEvent: LiveData<PushEvent>
AndroidX dependency is required for LiveData to work and in most projects it is used as standard.
Inside the Application class after initialising the SDK please observe on the LiveData like below
class MyApp: Application() {

// ....
// Init Push SDK
// ....

  PushSDK.pushEvent.observeForever { event ->
      Log.d("PushEvent", "${event.clientMetadata}")
  }
// ....

}
PushSDK.INSTANCE.pushEvent.observeForever(new Observer<Event>() {
    @Override
    public void onChanged(Event event) {
        Log.d("PushEvent", event.getClientMetadata());
    }
});
Please note these Notification_Tapped events will not be generated for In-App messages
The Notification and the client metadata can be obtained from the PushEvent object
data class PushEvent(
    var id: String,
    var eventType: EventType? = null,
    val title: String,
    val description: String?,
    var replacements: String?,
    val message: String,
    var clientMetadata: String?,
    val type: String?,
    val targetUrl: String?,
)
enum class EventType {
    NOTIFICATION_TAPPED,
    VIDEO_CLOSED
}
Force close Push Notification Content.
This method can be used to force close a notification view which is already in the foreground. This will enable the user to view any Deeplink related content within the app when a carousel image or a video button is tapped on. On calling this method, the notification content will be closed and the "viewed" telemetry data will be recorded
PushSDK.closeNotificationView()
Please note this method does not work for In-App related contents.